


- How To Modify an Existing Email Account in OS X 10.11
Pre-Flight Check
- These instructions are intended specifically for modifying an existing email account in Mac Mail on OS X 10.11.1 (El Capitan).
- Need instructions for an older version? Try How To Set up Email in OS X 10.5.
- For help with general email account settings, see How To Set up Any Email Client.
You can edit an email account that already has been configured in Mail, for example should you decide to switch between non-SSL and SSL settings or update the password.
To avoid data loss, please use caution any time you change an email account’s connection type or delete an email account. Removing an email account from a mail client also will remove all messages associated with it on the device and, specifically for POP accounts that are not configured to retain mail on the server, there may be no way to recover those messages. If you have any doubt or questions, please contact Heroic Support® for guidance.
Since any changes must be made on both the incoming and outgoing servers, updating the email account’s password or switching between non-SSL and SSL settings is not as simple as toggling a single setting, but the steps are easy to follow.
Step #1: Configure Incoming Server Settings
- You set the incoming mail server in the Internet Accounts preferences pane. To access it, select Accounts from the Mail menu.
- On the Internet Accounts preferences panel, select the name of your email account from the left pane to update the password or change the incoming server name or connection type.
- Update the Password
- To update the email account password, enter the new password into the Password field in the Internet Accounts preferences pane.
- Change the Incoming Server Name or Connection Type (SSL/non-SSL)
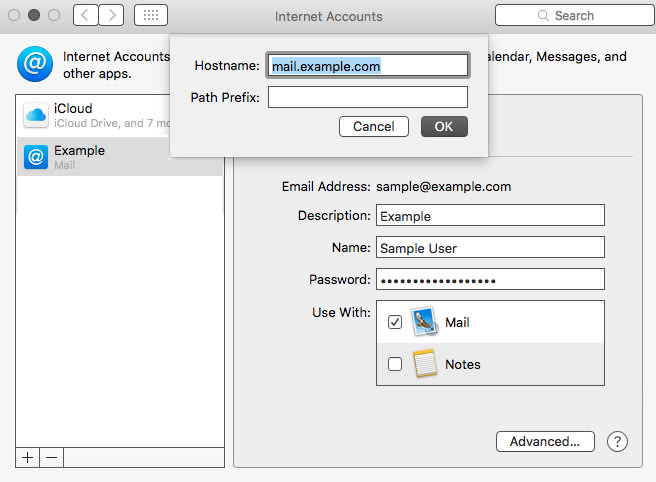
- Click the Advanced button at the bottom right of the Internet Accounts preferences pane to edit the Hostname via a popup panel.
- SSL settings will use the server’s hostname (e.g., host.yourdomainname.com)
- Standard non-SSL settings will use the domain name (yourdomainname.com or mail.yourdomainname.com).
- Once you have changed the Hostname, click OK.
- Click the Advanced button at the bottom right of the Internet Accounts preferences pane to edit the Hostname via a popup panel.
Step #2: Configure Outgoing Server Settings
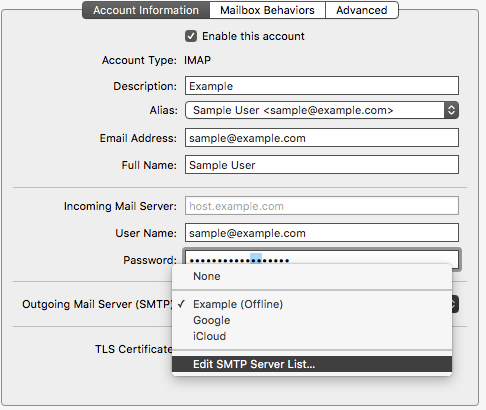
- Select Preferences from the Mail menu to open the Internet Accounts preferences pane, then click on the account in the left menu.
- On the Account Information tab, locate the Outgoing Mail Server (SMTP) row and select Edit SMTP Server List from the select menu.
- Change the Outgoing Server Name or Connection Type (SSL/non-SSL)
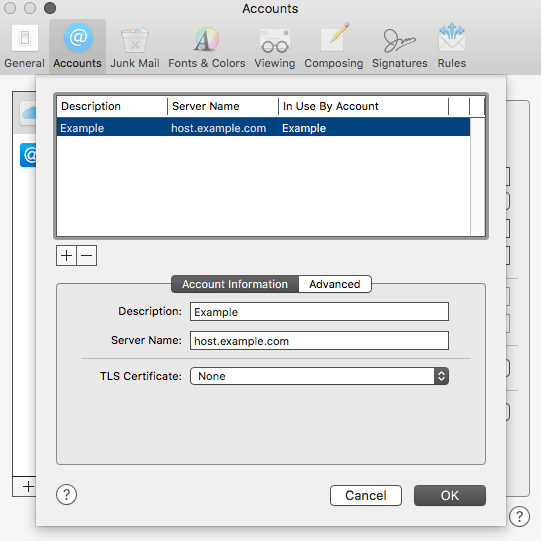
- Click on your mail server’s name in the top pane to select it, then change the Server Name on the Account Information tab to the desired value.
- SSL settings will use the server’s hostname (e.g., host.yourdomainname.com)
- Standard non-SSL settings will use the domain name (yourdomainname.com or mail.yourdomainname.com).
- Once you’ve changed Server Name to reflect the desired connection type, click on the Advanced tab to configure SSL settings.
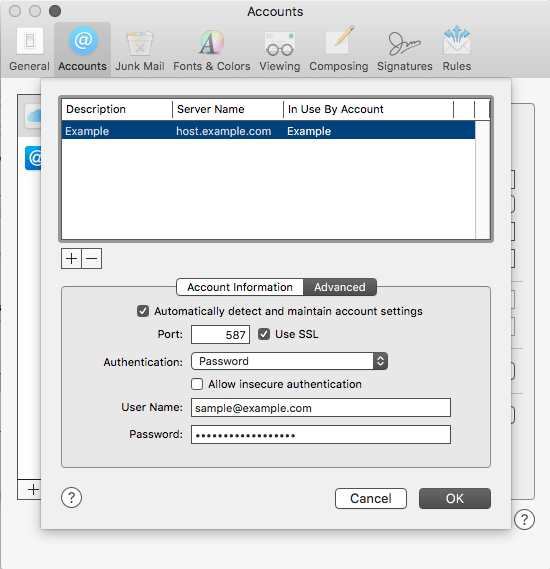
- Port: This should remain 587 regardless of connection method.
- Use SSL: If you are using secure (SSL) settings, ensure that the Use SSL box is checked. If you are using standard, non-SSL settings, Use SSL should be unchecked.
- Authentication should be set to Password regardless of connection method.
- Both the Username (full email address) and Password fields should be filled out. You can update the email account password by entering the current password into the Password field.
- Click on your mail server’s name in the top pane to select it, then change the Server Name on the Account Information tab to the desired value.
- Your email account will start using the new settings as soon as you click the OK button.
Related Articles:


About the Author: dpepper


Our Sales and Support teams are available 24 hours by phone or e-mail to assist.
Latest Articles
How to Clone a Drupal Site to Another Domain
Read ArticleTop Eight Virtualization Security Issues and Risks
Read ArticleAccessing Man Pages on Ubuntu 16.04 LTS
Read ArticlePremium Business Email Pricing FAQ
Read ArticleMicrosoft Exchange Server Security Update
Read Article